Switching from Windows to Linux sounds like a major undertaking. It isn’t. The actual installation takes less than 30 minutes. The preparation — which is mostly just backing up your files — is what takes the most time. This guide walks you through the entire process from first decision to working Linux desktop, step by step, with no assumptions about prior technical knowledge.
Step 0: Decide on Your Approach
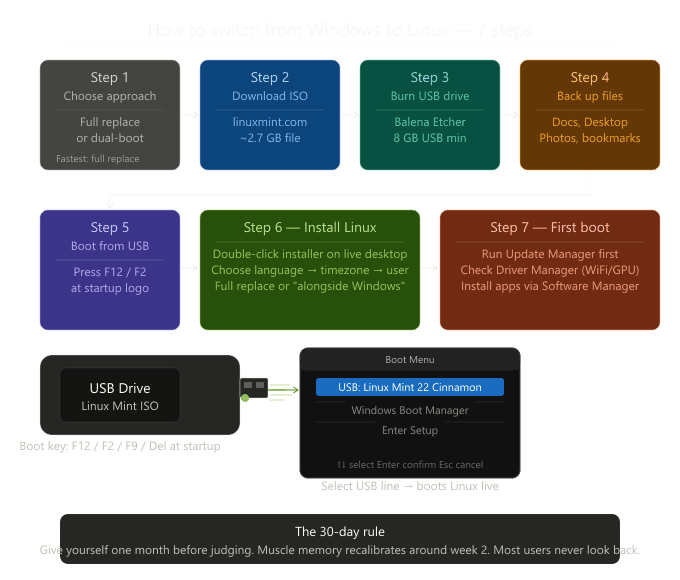
You have two main options. The first is a full replacement: wipe Windows, install Linux, done. This is the cleanest outcome and the one recommended if you’re confident Linux meets your needs. The second is a dual-boot: keep Windows on one partition, install Linux on another, choose which to boot each time you start the machine. Dual-boot is the safer transition path — you keep Windows as a fallback while you learn Linux.
If the machine in question is old, no-longer-supported Windows hardware that you’re specifically rescuing from end-of-life, full replacement is usually simpler. If it’s your daily driver and you have specific Windows applications you’re not ready to abandon, start with dual-boot.
Step 1: Choose Your Distribution and Download It
Based on the guidance in our previous posts: for most Windows users, download Linux Mint Cinnamon. Go to linuxmint.com, click Download, and select the Cinnamon edition. The download is an ISO file, around 2.7GB. Use a reputable connection — your home broadband or a library WiFi — and let it download fully before proceeding.
If you’re installing for students or family use, consider Zorin OS from zorin.com instead. The download process is identical.
Step 2: Create a Bootable USB Drive
You need a USB drive of at least 8GB. Any files on it will be erased, so use one you don’t need for anything else, or back up its contents first.
Download a free tool called Balena Etcher (from balena.io/etcher — it’s free, open-source, and runs on Windows). Open it, click “Flash from file,” select your Linux ISO. Click “Select target,” choose your USB drive. Click “Flash.” The process takes 5-10 minutes.
Windows users who prefer a more feature-rich alternative can use Rufus instead (rufus.ie), which is also free. Either works.
Step 3: Back Up Your Files
This step is non-negotiable. Before touching your computer’s boot configuration, back up everything you care about to an external drive or cloud storage.
Your backup checklist: Documents folder, Desktop, Downloads, Pictures, Music, Videos, any browser bookmarks (export them from your browser’s settings menu), any saved passwords if you use a local password manager, and any application-specific files like game saves or work project folders.
If you use cloud services like OneDrive, Google Drive, or Dropbox, confirm that syncing is up to date before proceeding. The Linux versions of Google Drive and Dropbox exist. OneDrive does not have an official Linux client, but your files are accessible through the browser at onedrive.com and through third-party tools like rclone.
Step 4: Test Linux Without Installing
Plug the USB drive into your computer. Restart it. When the manufacturer logo appears, press the key that opens the boot menu — commonly F12, F2, F10, or Del, depending on the brand. Lenovo typically uses F12; Dell uses F12; HP uses F9; ASUS uses F8. The specific key is usually shown briefly on screen during startup, or you can look it up by searching “[your laptop brand] boot menu key.”
From the boot menu, select your USB drive. Linux Mint will boot to a live desktop. This is your full hardware compatibility test: check WiFi, check sound, open the browser, check your screen resolution. If everything works, you’re ready to install. If WiFi doesn’t work, you can still install over Ethernet and address WiFi drivers afterward.
Step 5: Install Linux
From the live desktop, double-click the “Install Linux Mint” icon on the desktop. The installer walks you through a graphical setup:
Language selection — straightforward.
Keyboard layout — select your region and language. US English is the default; if you’re in a different region, choose accordingly.
Installation type — if dual-booting, choose “Install Linux Mint alongside Windows.” The installer will resize your Windows partition and create space for Linux. If replacing Windows entirely, choose “Erase disk and install Linux Mint.” This is irreversible — confirm your backup is complete before selecting this.
Time zone — set your location.
User account — choose a username and password. This is your Linux login password. Choose something you’ll remember, and enable the “require password to log in” option.
Click Install. The process takes 15-25 minutes depending on your drive speed. The installer copies files, configures the bootloader, and sets up your user account while displaying a slideshow of Linux Mint features. When it completes, it will prompt you to restart and remove the USB drive.
Step 6: First Boot and Initial Setup
After restarting, you’ll see the GRUB bootloader screen if dual-booting — it gives you a few seconds to choose between Linux Mint and Windows. Linux is the default. Boot into Linux Mint.
Log in with the password you created. The Welcome screen that appears includes links to the driver manager (check for any hardware drivers, particularly for WiFi or NVIDIA GPUs), the update manager (run all available updates before doing anything else — this is equivalent to Windows Update), and documentation.
Step 7: Installing Your Software
Open the Software Manager from the taskbar. Linux Mint’s software manager is a graphical app store — search for applications by name, click Install. For the most common replacements: VLC for media playback, LibreOffice for office documents (likely already installed), GIMP for image editing, Thunderbird for email, and your preferred browser (Firefox is pre-installed; Chrome is in the Software Manager as “Chromium”).
For any Windows application you can’t immediately replace, try searching “[application name] Linux alternative” — the Linux ecosystem has answers for almost every category.
The 30-Day Rule
Give yourself 30 days before making a final verdict. The first week will involve muscle memory conflicts — looking for settings in the wrong places, right-clicking and getting an unexpected menu. By the end of the first month, those reflexes have recalibrated. Most users who stick through the first two weeks find that Linux Mint, in particular, stops feeling different and starts feeling normal. That’s when the advantages — the absence of update-forced reboots, the absence of advertising in the start menu, the absence of bloatware, the absence of a countdown clock to forced obsolescence — become the baseline expectation.
Microsoft gave you a deadline. You don’t have to comply with it.
Leave a Reply